 After pressing the collections button in main menu you get to collection overview screen. You will see a list of all your collections including some information about number of entries (see image on left side). All entries are sorted by name in this scrollable view.
Delete an existing collection
Deleting an existing collection is possible in two ways. First simply do the swipe-to-delete gesture on the designated collection. It causes a delete button to confirm this operation.
Second way to delete a collection please push edit button on top of the screen. Now select the row you want to delete and press the recycle bin on the bottom right side.
You will need to commit this action in an additional pop-up dialogue.
Note: When you delete a collection, all stored items within this collection will be deleted as well.
 Add a new collection
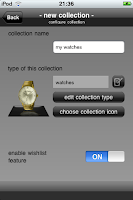
Whenever you want to add a new collection press the (+) button on the bottom left side. A new collection will appear on top of the list. Continue by choosing the new collection you will get to the collection setings screen (see image on right side).
At first please insert a new name for your collection.
Then choose on of many predefined collection templates that best matches the items you want to store. An icon will be selected automaticly. If you like more collection templates you can find them on this website for download.
You now can change the icon for your collection by pushing the choose collection icon button.
Note: your chosen collection template contains some relevant data fields to store informations about your items. You can use this template easily. If you want to customize your collection by adding new fields, deleting fields or changing them please press edit collection type button.
There are defined lots of templates for different collection types. Some of them represent items that you own, others can store information about more abstract things, like journeys or jokes or citations. If your collection contains items that you own (or want to own) you can activate the switch enable wishlist feature. In this case it will be possible to put some items to your wishlist within allThings.
If you use allThings full version and when you are authorized by super-user-password you will find an other switch protect with super-password here. It causes this collection to be hidden as long as you are not authorized using your super password in the future. This way you can protect your special data from being shown to anyone who has only the simple password.
When you are finished you get back to the main menu screen pressing the back button.
Note: If you can not find a collection template that fits to your needs, you can create your own or visit our download site.
No comments:
Post a Comment