7/28/2014

show it with images...

A picture says more than 1000 words. Now you can add as many images to your collection items as you want.
Just go to collection configuration screen to customize your collections and add image-fields to your collection. You also can change order of your data fields by dragging them to the place you want.

7/27/2014

allThings - which version to use...?

allThings lite - a fully functional managing app. And allThings (full version) even better!

featureallThings liteallThings 2.0


iPhone 5

iOS 7.0
 
yes

yes
yes
+ retina 4" supported
yes
+ new iOS 7 layout

maximum number of items
 
unlimitedunlimited

maximum number of collections
 
3unlimited

categorization
 
yesyes

using dates for category


-
yes


maximum number of images

1 per collection item
unlimited
import/export datasingle items
whole collections
single items
mulitple items
whole collections

import new icons
 
-yes,
from allThings website

send data via email
 
yesyes

security
 
password protectionpassword protection
super-password protection

color profiles
 
 36

collection templates
 
2836

little black book
 
 download from portal
(no icon)
yes

wishlist feature
 
 yesyes

customizable collection types
 
 yesyes
special features -change collection of an item
improved import file information
improved user interface
remember position at shutdown

sorting items
 
 -yes
offline help -yes

We have changed our new version of allThings lite - we removed all limitations on the number of records.

3/13/2014

experience iOS 7 - layout with allThings

Good news for iPhone 5/5c/5s user: get allThings in iOS 7 layout
* pick your favourite color
* run allthings with improved performance
* get allThings for free, now:

AXF7PRJRKK7F

LENF43KKTR3M
 

LFAAR4YKW6KR
 

LPEAY6FWHPP9
 

6PLFYRJY46FX

10/31/2012

more information with iPhone 5 retina display

Our new version of allThings is out...!

Now, get all information on one screen - we have optimized viewing on apple's 4-inch-retina-display of the iPhone 5.
We also took care about performance of the app - it's now smarter and faster to manage your "things".

7/07/2012

a modern "little black book"

Do you need to hide some special information from others?
Do you have names of women (or men) and telephone numbers or other sensitive data, that you need to store discreet and secure?
Just use allThings to manage your data and hide it from everyone else. And that's how to do:

1st - Load allThings full version.

2nd - Define two passwords, one to get access to the data stored inside the app and the second one to access your special data.

3rd - Create a new collection of type "people" and activate the switch "secure by super password"

4th - Enter your secret data: names, phone numbers, images into your new "little black book"-collection.

5th - define some additional collections containing some data. Thats for confusing other people.

Now you are done. Whenever you start allThings you will be asked for a password. Insert your super password to get full access to your data including your "little black book"-collection.
Whenever you enter your normal password you will get access to all data except your "little black book"-collection.
o nobody will ever recognize that you are hiding some data!

A perfect hiding place to your secrets... Try it out...


Can you find the difference 

between these two screenshots?

<-- app by using password

app by using super password --> 

4/27/2012

Get the new version for free!

FREE PROMO CODES:

37EN6PYNMKYT 
W4TTE4F9JT6J 
NTFA4XR3XXAF

Redeem free promo codes via iTunes or using your iphones "app store" app

10/25/2011

allThings - new version - released

allThings lite Version 1.6 released today:
besides some improvements concerning iOS5 you can now choose your favorite color to customize your app.

allThings (full version) Version 1.7 released today:
* choose your favorite color on display
* send multiple items to friends by email
* find imported items at once
* use the improved search function to find whatever you are looking for

Find out about these and more new features of allThings.
e.g. keep your secrets perfectly secured with your super password... And by the way never tell anyone that you are hiding it.

...just enjoy!

9/03/2011

allThings - new version - released

These days a new version 1.5 of allThings will been released. Currently waiting for review by Apple.
Many customers sent us requests of new features and suggestions - we have worked hard to implement most of them. Version 1.5 offers a wide range of new features

  • downloading new collection icons from this site or receive them from friends by export/import files. If you would like to use a special icon please send us via email. We will convert it to a icon file and send it back to you. Thanks to Hans for this request.
  • new field type "checkbox" added to use in your records for yes/no properties. You can add this field type to your collection as described hereThanks to John for this request.
  • Super-user-mode added. New version provides a double password protection. Use first password (standard password) to get access to your data and do whatever you want. But some of your collections are hidden. You can not access or export them you even can not see them. Use your second password (super password) at the login screen of allThings to get access to these special collections. As long as you use your standard password, you can hide your confidential data - and no one will recognize that you are hiding something. Thanks to Paul for this request.


In addition now you can download new collection types from this side, for example:
  • "my life" - to collect data about things happening in your life or the first steps of your baby including pictures (English:  my life German: mein Leben)
  • "lend out items" - manage all things that you have lend out to someone else (English:  dvd's, books German: DVDs, Bücher)

7/31/2011

get allThings full version - for free

Are you obsessed with comic books? Crazy for the rarest coins? Obsessed with the latest and greatest set of shoes to hit the streets? No matter what you are collecting there’s a way to curate your collection with the awesome allThings iPhone app.

Now get allThings - for free!

That's how to do:
Load allThings - lite version. Have a look at it and if you like the app, write a short review about it in the app store. First 25 reviewers get the paid full version of allThings for free. In order to receive one of these 25 coupons send an email to worth.it@keepyourspirit.de after having written a review.

Importing your data from lite version into your free copy of allThings is quite simple. Read more about it here.
Find out about many new features in full version.

7/20/2011

allThings lite - upgrade to full version

Have you ever wondered how to transfer your data from lite to full version? Thats quite simple. Did you load allThings from the app store? Let's start...

First step: Use your iOS device to create a backup of all stored collections in the configuration menu of allThings - lite. Make sure to have the switch include images in backup files activated.

Second step: Connect to iTunes and copy the backup file from your iOS device to your pc or mac. You can find the backup file in the file sharing section of your apps (see image for details).

Third step: Now you can store this backup file in the file sharing area of allThings.

Last step: Start the full version in your iOS device and import your data from the backup using standard import function described here. Now you can delete allThings - lite, all features of this version will be available in full verion - and some more... try it.

Note: If you want to transfer your data without using iTunes, send an email including each of your collections to yourself using allThings - lite and import it in allThings. See here for more information about sending emails and importinmg .ath files.

5/31/2011

main menu


Whenever you start your app you will get to the main menu. Here you can choose wether to manage your collections, view wishlist or change basic setting on settings screen.
You may decide to protect your data stored inside by defining a password. In this case you will need to insert the correct password before you get access to the content of allThings. Activate password protection in setings screen.

list of collections

After pressing the collections button in main menu you get to collection overview screen. You will see a list of all your collections including some information about number of entries (see image on left side). All entries are sorted by name in this scrollable view.


Delete an existing collection
Deleting an existing collection is possible in two ways. First simply do the swipe-to-delete gesture on the designated collection. It causes a delete button to confirm this operation.
Second way to delete a collection please push edit button on top of the screen. Now select the row you want to delete and press the recycle bin on the bottom right side.
You will need to commit this action in an additional pop-up dialogue.

Note: When you delete a collection, all stored items within this collection will be deleted as well.

Add a new collection
Whenever you want to add a new collection press the (+) button on the bottom left side. A new collection will appear on top of the list. Continue by choosing the new collection you will get to the collection setings screen (see image on right side).

At first please insert a new name for your collection.

Then choose on of many predefined collection templates that best matches the items you want to store. An icon will be selected automaticly. If you like more collection templates you can find them on this website for download.

You now can change the icon for your collection by pushing the choose collection icon button.

Note: your chosen collection template contains some relevant data fields to store informations about your items. You can use this template easily. If you want to customize your collection by adding new fields, deleting fields or changing them please press edit collection type button.

There are defined lots of templates for different collection types. Some of them represent items that you own, others can store information about more abstract things, like journeys or jokes or citations. If your collection contains items that you own (or want to own) you can activate the switch enable wishlist feature. In this case it will be possible to put some items to your wishlist within allThings.

If you use allThings full version and when you are authorized by super-user-password you will find an other switch protect with super-password here. It causes this collection to be hidden as long as you are not authorized using your super password in the future. This way you can protect your special data from being shown to anyone who has only the simple password.

When you are finished you get back to the main menu screen pressing the back button.

Note: If you can not find a collection template that fits to your needs, you can create your own or visit our download site.

list of items

After selecting a collection ("my watches" in this example) you get to the list view containing all items of the selected collection. You can scroll through all items listed here. In addition you can search for enties by name or any other displayed property.
In the upper part of this list all items that you have stored (see image on left side) are displayed. If you also imported items from an other iOS device (or a download) they will be displayed at the end separated by a title bar displaying the name of the other device.

Deleting an existing item
Deleting an existing item is possible in two ways. First way simply do the swipe-to-delete gesture on the designated item. This causes appearing a delete button to confirm.
For second way to delete an item please press the edit button on top of the screen. Now select the row you want to delete and press the recycle bin on the bottom right side.


Add a new item
Adding a new item to your collection is possible in two ways.

First way to add a new item press the (+) button on the bottom left side. A new empty item will appear on top of the list. Continue by choosing this new entry you will get to the input screen for the new item. Here you can insert all data you would like to store about the new item. 
Second possibility is to make a copy of an existing item. So you can use all stored data of one item for the new, similar entry. For doing this push the edit button on top of the screen, choose the item you want to make a copy of and press the copy (see image on right side) button on the bottom of the screen.


categorization of items

Within allThings you have a global setting that lets you switch on/off the categorized view of all collections.
When you switch it ON, you do not get a plain list of all records when you enter a collection. Instead you get the top categorisation. All values of the top category field are listed and there is a counter how many records belong to each value of this field.
When you enter one category, that means your choose one value of this categorization field, your get to the second categorisation level. That means all records in the chosen category will be displayed categorized again. You can use as many categorisation levels as you want.
Defining a categorisation field is possible in collection definition screen. You can add new data fields or remove them. Your even can change their order.
Each data field of type "choice field" can be set to be a categorization field. Just switch "use for categorization" to ON. If you have all your categorization fields defined, go on to define the levels. Top categorisation will be the upper most "choice field used for categoristaion" in the data field list of your collection type. Second categorisation level the second "choice field used for categoristaion" in the list from top to down and so on. If you want to change categorization levels, just change data field order.

details of an item

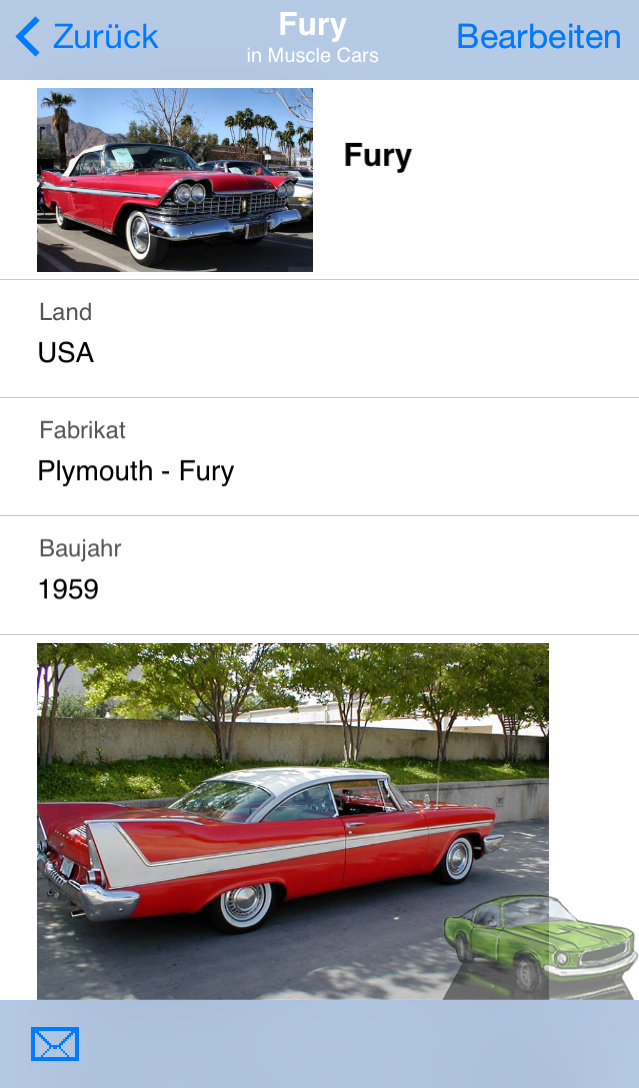
Tap on one item on the list of a collection to view detailed information about the selected item. By tapping on the image it will scale to full screen. To return from full screen view of the image simply squeeze the image to minimize.


Edit item
Go to the edit screen by pushing the edit button on top of the screen. You can insert data for all fields defined for the associated collection (see images on right side). You can add an image to each entry. For this you can choose an image from you library or take a new one by the iPhone camera.
In addition there are input fields for text, numbers, dates and notes - it depends on how your collection is defined. When inserting data to an text field it is possible to use a data picker to choose data instead of inserting it.

Note: If you would like to change data fields, add or remove fields you can do it by editing the collection type.

Note: When you are using allThings full version you can change the collection this item belongs to. When you have defined more than one collection of the same collection template you can move an entry from one to an other collection of the same type.


sharing data with friends - or - how to open a .ath file?

Whenever you want to share some of your collections or some records with your friends, you can create a .ath file containing these data. Another person can open the data very easy by opening the file in allThings.

sending a whole collection
At first navigate to the collection overview screen and press the edit button. Now you are in edit mode, that means you can choose a collection to edit. If you have chosen one the buttons on the bootom of the screen will change to active. Push the send button (this one showing a letter icon) and the application will put all items of your selected collection to an archive file and change to the iPhone email screen. Now enter the email address of the person you want to sent the wishlist to and press the send button.


sending one or more single records
At first navigate to the list of items within a collection and press the edit button. Now you are in edit mode, that means you can choose a record to edit. If you have chosen one or more the buttons on the bootom of the screen will change to active. Push the send button (the one showing a letter icon) and the application will put the selected items to an archive file and change to the iPhone email screen. Now enter the email address of the person you want to sent the wishlist to and press the send button.

The email will be sent immediatedly and the receiver will automatically be asked to opens the file using allThings-app to import your data.

Note: When you have added a picture to your items these pictures will be included in the archive file when include images in exports is switched on in the main settings menu.

wish-list feature

Managing you collections does not only mean to get an overview about things you own, but also manage information about things you want to own - for example in order to complete your collection. For this you can use the wishlist feature of allThings.
Each collection can be set to enable the wishlist feature in collection settings screen by turning on the wish-list switch (see collection settings). When doing this you will get a switch added to each item in the current collection. With this switch labeled "to the wishlist" you put the item of your collection on the all-in-one wish-list of the app. The item will be marked as "wish" in the list of items and all wished will be listed separate at the end of the list.

Once you have put items of different collections on your wishlist you are able to access your wishlist on the main menu screen. Your wishes from each collection are listed now and you get a perfect overview about everything you need to complete your collections. You can send this list to anyone to get this person informed what you would like to have - maybe in preparation of your birthday?

sending your wishlist by email
Whenever you want to give your wishlist to another person simply go to the wishlist screen. Pushing the  send button on the bottom of the screen the application will put all items of your wishlist to an archive file and change to the iPhone email screen. Now enter the email address of the person you want to sent the wishlist to and press the send button.
The email will be sent immediatedly and the receiver automatically opens the file using allThings-App to import your wishlist.

Note: When you have added a picture to your items these pictures will be included in the wishlist file when "include images in exports" is switched on in the main settings menu.


managing wishlists from different person
Whenever you received a wishlist from another person allThings will ask you to import it to your database.  When import has finished your wishlist screen will change a bit. From main menu you at first will get to a choice screen where all different wishlists are listed (see picture on left side). Simply choose the one you want to view and it will be shown.

deleting an item from a wishlist
Wishlists contain items that you want to own. When you delete an item from your wishlist by doing the switpe-to-delete gesture it will be removed from your wishlist - it will not be deleted. 
Usually you add an item to you collection and mark it to be your wish. Later when you own this item, just the mark thats a wish will be removed. The item will remain in your collection.

Note: If you want to permanently remove the item from your collection, navigate to the corresponding collection to delete it as described here

main settings menu

Set up allThings on the main settings menu by deciding about general behaviour of the application. From main menu you get to the configutation menu by pushing settings button.

show records with categorisation
When show records with categorisation is activated all items of a collection will be displayed in categories. For example if your collection is about books, items will be categorized by language. If you choose English: all English books will be shown categorized by genre and later by author. So you have a very good overview about your books. This feature will be describes more detailled in  categorization.


skip categories without alternatives
When items are shown categorized sometimes all items will be in one category so there is no alternative category to choose. if skip categories without alternatives is activated these screens will be skipped so you do not need to choose the one and only value in this case.

use password
You can protect your data stored in allThings against access of unauthorized people. Simply switch use password on and you will be asked to provide a password. Please insert it twice to verify your input. Each time allThings is started you are asked for the password to use the data.

When you use allThings full version there will be a second pair of password input fields. Here you can provide a second, a super-user-password. Both passwords will give you access to your data. But only the super-user-password lets you see all collections. When you have some very special collections you can hide them from collection list when just the normal password is used. (learn more about this feature here)

resize images
You can add images to the items in your stored collections. The images you choose will be resized while import for memory issues. Here you can decide about the maximum format to be used for resizing. A smaller image format has in effect a smaller file size of the file but also a lower image quality.

include images in exports
All data stored in allThings can be exported to an archive ath-file to be send to other persons or to be used for backup reasons. You can decide wether include images of your items in the exports or not. If include images in exports is turned off images will not be included. This causes a smaller file size of the archive file and a faster processing while import or export.

Note: If images are not included in exports the files are smaller and can maybe better send by email. All data will be imported and can be used by another device, but not the images. Images can be added later by hand.

show origin for imported records
When you receive data from an other person you can import it and use it with allThings. If show origin for imported records is switched ON, all imported items from different devices will be listed separate. In this case when you browse a collection all items are listed separated by an orange bar showing the original device the item was imported from (see image on right side).
In detail view of each imported dataset the original device name will be shown as well (see here).

create backup
Pressing on the button create backup allThings will put all data of all collections in one large archive file that can be used for backup reasons. Depending on your configuration (see above) images will be included or not.
The archive files are stored in the application memory on your device. You can access them via iTunes for example or use them to import into allThings.

import file
The button import file takes you to a list of available files for import. There are all backup files, imported files from different devices and all exported files that you have send by email. Simply choose the file you want to use for import and press import. All data stored in this file will be added to your database.

Note Backup: If you import a full backup file from your own device all collections included in the backup are deleted and populated with data from the backup.


Note own collection archive: If you import a complete archive of one of your own collections the corresponding collection is deleted and populated with data from the file.

Note received collection archive: If you import a complete archive of a received collection (from another device) a corresponding collection will be searched to import all items from the file. If no collection can be found a new one will be created that matches all items from the archive file.

Note received item archive: If you import a single record of a collection (your own or from another device) a corresponding collection will be searched to import this items from the file. If no collection can be found a new one will be created that machtes the item from the archive file.

When you have imported data from an ath-archive file you will find a badge icon on the corresponding collection that informs you about the number of imported items.


customize your collection

allThings comes with lots of collection templates that you can use for many purposes. In addition you are able to download new templates from the internet, customize any predefined collection or create your own collection templates.

If you want to change data fields of your  collection go to the collection overview screen and press the edit button. Now choose the collection you would like to edit, you will get to the collection configuration screen (see image on right hand side). Choose button edit collection type and you will see a list of available data fields of your collection (see image on left hand side).


Note: It's highly recommended to make a backup of the collection you want to edit.


add a new data field
You can add a new data field to your collection by pressing the "+" button on the bottom of this screen. The new data field will be created at the end of the list and is now ready to be defined in detail.


delete a data field

If you want to delete a data field from your collection, there are two ways to do this. First press the edit button on top of the screen. Now you are in edit mode and you can choose the data field to be deleted.
Press the recycle bin button in the lower right corner. The data field will be deleted immediately.
The second way it just swipe-to-delete about the data field you want to erase.


Note: If there is stored some data in the collection the values contained in the erased fields are deleted, too.

re-arrange data fields
If you want to change the order of available data fields press the edit button in upper right corner of the screen. Now you can drag & drop the fields to re-arrange them one by one (see image on left hand side).

Note: Rearranging fields that are used for categorization takes effect on the categorization of your items. See here for more detail.

define data fields
In order to define a data field in detail switch into edit mode and choose the field to be edited. You will get to the detail screen for data fields (see image below).


At first define the name of the data field. This name will be displayed in detail screen of each dataset.

Now define the data type of your field. There will appear a data type picker to help you choosing the right data type. Choose the data type that best fits your needs.
Note: Once you have set a data type it will not be possible to change it because of technical restrictions.

You can use this data field for categorization. If you activate the switch use value for categorisation all datasets will be displayed grouped by the value of this field the provide a quick overview of your data. Categorisation will only be available for choice fields.
Note: You can use cascading categorisation if you define multiple data fields to be used for categorisation. See here for more information.

In the lower part of this screen you can define which values of your dataset will be displayed in overview list of your collection. There is some space for up to four values to be shown for each dataset. Just choose one of the positions (field_1 ... field_4) to show values of this data field in collection overview list. If you do not want to show values of this data field in your list, simply select no in this control. A preview dataset will be displayed below.

It you are done, save your changes by pressing save button when you leave.